An Alaskan chainsaw mill transforms a regular chainsaw into a portable sawmill that can turn logs into usable lumber right where trees fall. This affordable tool appeals to woodworkers, homesteaders, and anyone who wants to mill their own timber without hauling logs to a professional mill. Getting started requires understanding the basic setup process and knowing what equipment works best.
The key to setting up an Alaskan mill for the first cut involves attaching the mill brackets to the chainsaw bar, adjusting the depth posts for desired board thickness, and securing a level guide board to the log that the mill can ride along. This initial cut creates a flat reference surface that makes all subsequent cuts straight and accurate. Without proper setup on this crucial first pass, every board cut from that log will be uneven.
The process involves more than just clamping on the mill attachment. Success depends on choosing the right chainsaw and equipment, preparing the log properly, creating an accurate guide system, and understanding the techniques that prevent common mistakes. Learning these fundamentals helps beginners avoid wasted wood, damaged equipment, and frustrating results.
Last Updated: June 2026 | Will Montgomery has set up and run an Alaskan chainsaw mill on multiple log species. This guide walks through the exact setup steps he uses for straight, repeatable first cuts.
Understanding Alaskan Chainsaw Mills and Key Equipment
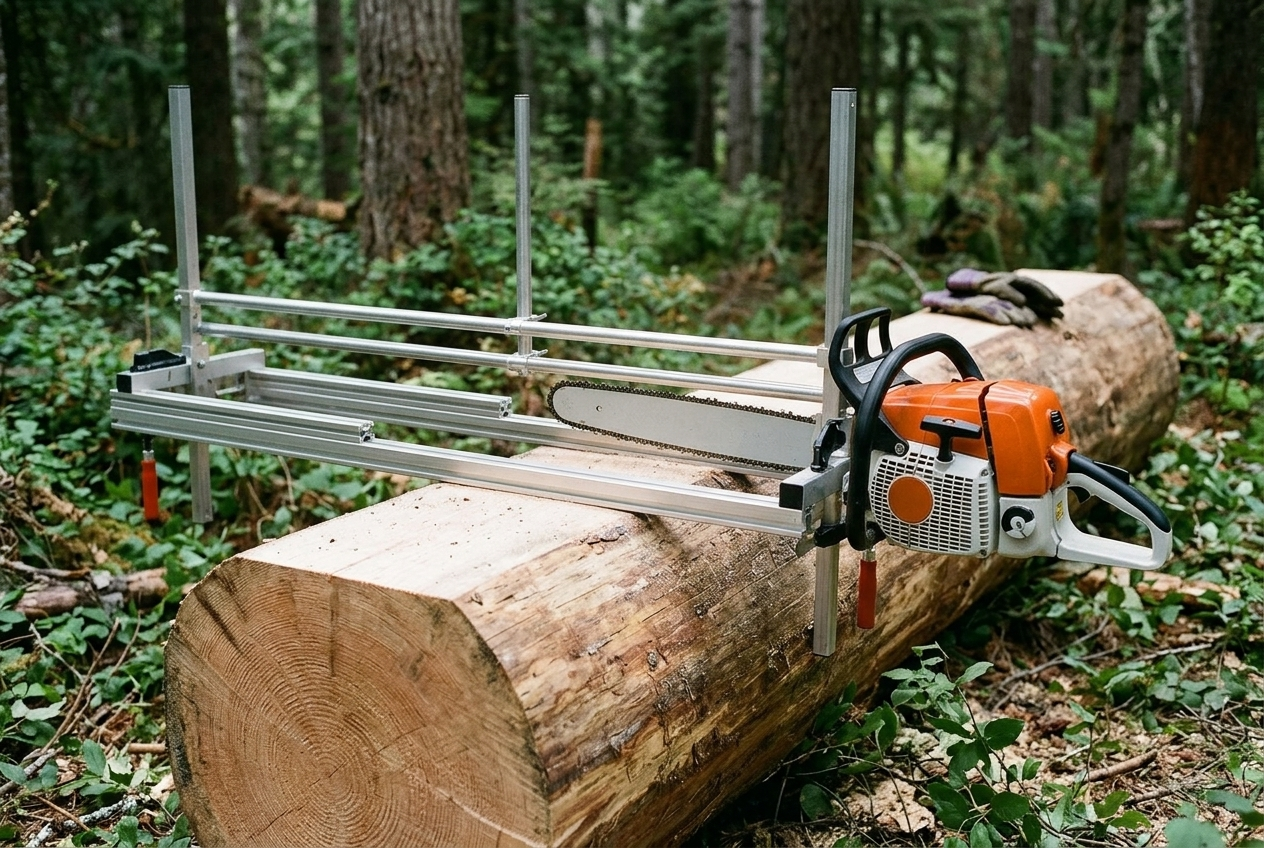
Featured tool: The Granberg Alaskan Mini Mill (G555B, 24-inch) is the most widely used Alaskan chainsaw mill attachment — compact, adjustable, and compatible with most full-size chainsaws.
An Alaskan chainsaw mill transforms a standard chainsaw into a portable sawmill that cuts logs into usable lumber. Selecting the right mill type and pairing it with proper equipment ensures accurate cuts and efficient milling from the start.
Key Features and Types of Alaskan Chainsaw Mills
Alaskan chainsaw mills are 100% American-made and attach directly to a chainsaw bar using brackets and bolts. The mill rides along a guide rail or board to create flat, consistent cuts through logs.
The basic design includes adjustable depth posts that control slab thickness. Users can set these posts to cut boards ranging from thin planks to thick beams. The mill’s frame keeps the chainsaw bar stable during cuts.
Different mill sizes accommodate various log diameters and bar lengths. Smaller mills work well for logs up to 24 inches wide, while larger models handle logs exceeding 36 inches. The cutting width must match or exceed the log diameter for successful milling.
Most mills include a level guide system for the critical first cut. This system attaches to the log and provides a straight reference surface. Without a level first cut, all subsequent cuts will follow the same uneven pattern.
Essential Chainsaw Specifications for Milling
A chainsaw with at least 50cc displacement works for smaller mills, but more powerful saws handle larger jobs better. Professional milling requires substantial power to maintain consistent cutting speed.
Popular models like the Stihl MS661 or MS880 work effectively for milling, particularly when processing large diameter logs. These saws provide enough torque to power through hardwoods without bogging down.
Bar length depends on the log width. A 36-inch bar cuts logs up to 36 inches wide in a single pass. Longer bars allow wider cuts but require more powerful engines.
A sharp ripping chain designed specifically for milling makes a significant difference. Standard crosscut chains tear wood fibers instead of slicing cleanly. Ripping chains have differently angled teeth that cut along the grain efficiently.
Overview of Granberg Alaskan MKIV and Accessories
The Alaskan MKIV is a professional-grade model with enhanced precision adjustments for repeatable accuracy. Its robust construction handles demanding milling tasks while maintaining consistent cut quality.
The MKIV features improved depth adjustment mechanisms compared to basic models. These adjustments allow woodworkers to dial in exact measurements for dimensional lumber. The system maintains these settings throughout extended milling sessions.
Key accessories include guide rails that attach to logs for the first cut. Some users add winch systems for easier handling of heavy mills during long cuts. The winch pulls the mill through the log, reducing physical strain.
Additional components like end brackets secure firmly to various chainsaw bar configurations. Replacement parts are available for wear items like adjustment bolts and guide rollers.
Preparing Logs and Milling Site
Getting logs ready and setting up a proper work area makes the difference between smooth milling and frustrating problems. The right preparation keeps cuts straight, protects equipment, and makes the entire process safer.
Chainsaw Mill Log Preparation Techniques
Proper log preparation starts with selecting the right timber for the intended project. Straight logs between 6 and 12 feet long work best for most milling operations. Shorter logs are easier to handle but produce less usable lumber.
Debarking removes dirt and debris that dulls chains quickly. A drawknife works well for manual removal, while a pressure washer strips loose bark efficiently. Green logs cut easier than dry logs but take longer to cure and may warp more during drying.
The log needs stabilizing before any cuts begin. Wooden chocks or wedges placed on both sides prevent rolling during milling. Checking the log for embedded metal with a metal detector saves chains from costly damage.
Measuring and marking cut lines with chalk creates clear visual guides. Leaving an extra half inch beyond the final desired dimensions accounts for shrinkage and trimming after drying.
Choosing and Leveling Your Milling Location
The milling site needs firm, level ground that supports both the log and operator safely. Concrete pads or compacted gravel provide stable surfaces that won’t shift during cutting.
Space matters more than most beginners realize. The area should extend at least 3 feet beyond each end of the log and 4 feet on both sides. This room allows safe movement around the log and provides space for cut lumber.
The log must sit level in two directions before starting. Using a carpenter’s level on top of the log checks for twist or tilt. Adjusting chock positions corrects any angles that would result in uneven cuts.
Never position logs on slopes where they could roll. Working on flat ground reduces physical strain and keeps the mill stable throughout each pass.
Handling Log Tension and Moisture Content
Internal tension in logs causes problems during milling that many first-time users don’t anticipate. Trees growing on hillsides or under stress develop tension wood that can pinch saw bars or cause lumber to warp severely.
Inserting wedges every 12 to 18 inches behind the cut prevents pinching as internal tension releases. The first wedge goes in as soon as the bar clears the initial entry point. Wedges should only go in far enough to keep the kerf open without forcing it wider.
Green logs contain high moisture content that makes cutting easier but requires longer drying times. Applying end sealer to fresh-cut log ends immediately after felling slows moisture loss and reduces checking. A second application after milling provides additional protection.
Dry logs resist cutting but produce more stable lumber with less shrinkage. They require sharper chains and more frequent breaks to prevent overheating equipment.
Selecting and Creating an Accurate Guide Rail
The guide rail determines the quality of your first cut and sets the foundation for all subsequent cuts. A straight, level, and properly secured guide rail makes the difference between smooth, usable lumber and wasted material.
Guide Rail Options: Ladders, Rails, and DIY Solutions
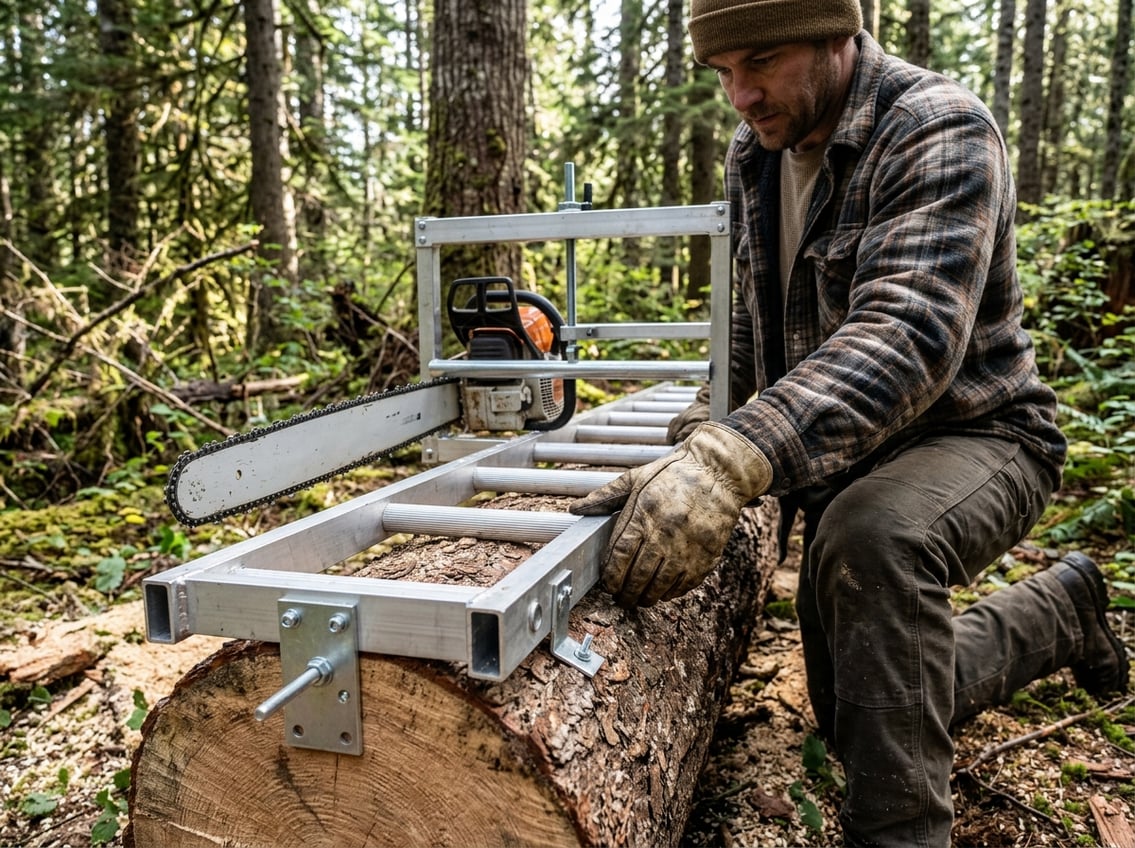
An aluminum ladder serves as one of the most popular guide rail options for chainsaw milling. The ladder provides a wide, stable platform that the mill can ride along during the first cut. Most millers choose an 8-foot or longer ladder depending on log diameter.
Dedicated milling rails offer another solution. These aluminum or steel rails are specifically designed for chainsaw mills and feature attachment points for securing clamps. Setting up your Alaskan mill involves attaching brackets to your chainsaw bar and adjusting depth posts to your desired slab thickness.
A simple 2×4 or 2×6 board works for smaller logs. The board must be perfectly straight with no warping or bowing. Some millers prefer dimensional lumber because it’s lighter and easier to position than metal alternatives.
How to Make a Guide Rail for Chainsaw Milling
Start by selecting a straight piece of material at least 2 feet longer than your log’s diameter. Check straightness by sighting down the length or using a string line. Any bow or twist will transfer directly into your cut.
Attach mounting blocks or brackets at regular intervals along the rail. Space these attachment points every 2 to 3 feet for proper support. The blocks should extend far enough to clamp securely to the log without interfering with the mill’s movement.
Creating DIY guide rails for chainsaw milling allows customization for specific log sizes. Sand any rough edges that might catch on the mill. Apply paste wax to the top surface where the mill will slide for smoother operation.
Leveling and Securing the Guide Rail for the First Cut
Place the guide rail across the top of the log and use a bubble level to check for level along its entire length. On uneven ground, use shims or wedges under the rail supports to achieve level. A digital level provides more precise readings than a standard bubble level.
Secure the rail with at least three heavy-duty clamps. C-clamps or quick-grip clamps rated for at least 300 pounds work best. Position clamps so they don’t interfere with the mill’s path along the rail.
Setting up the rail system requires checking stability before cutting begins. Push and pull on the rail to test for any movement. Even slight shifts during cutting will create an uneven surface. Recheck level after tightening all clamps since clamping pressure can sometimes shift the rail position.
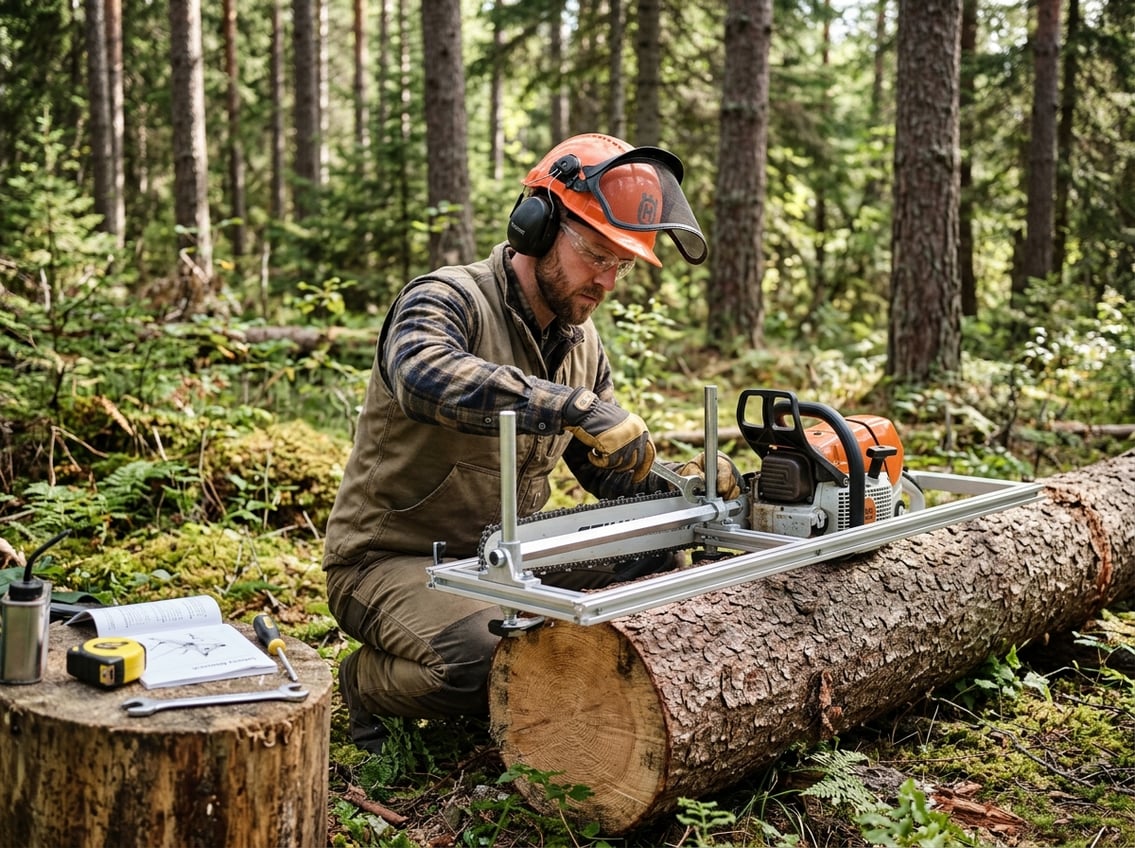
Step-by-Step Alaskan Chainsaw Mill Setup

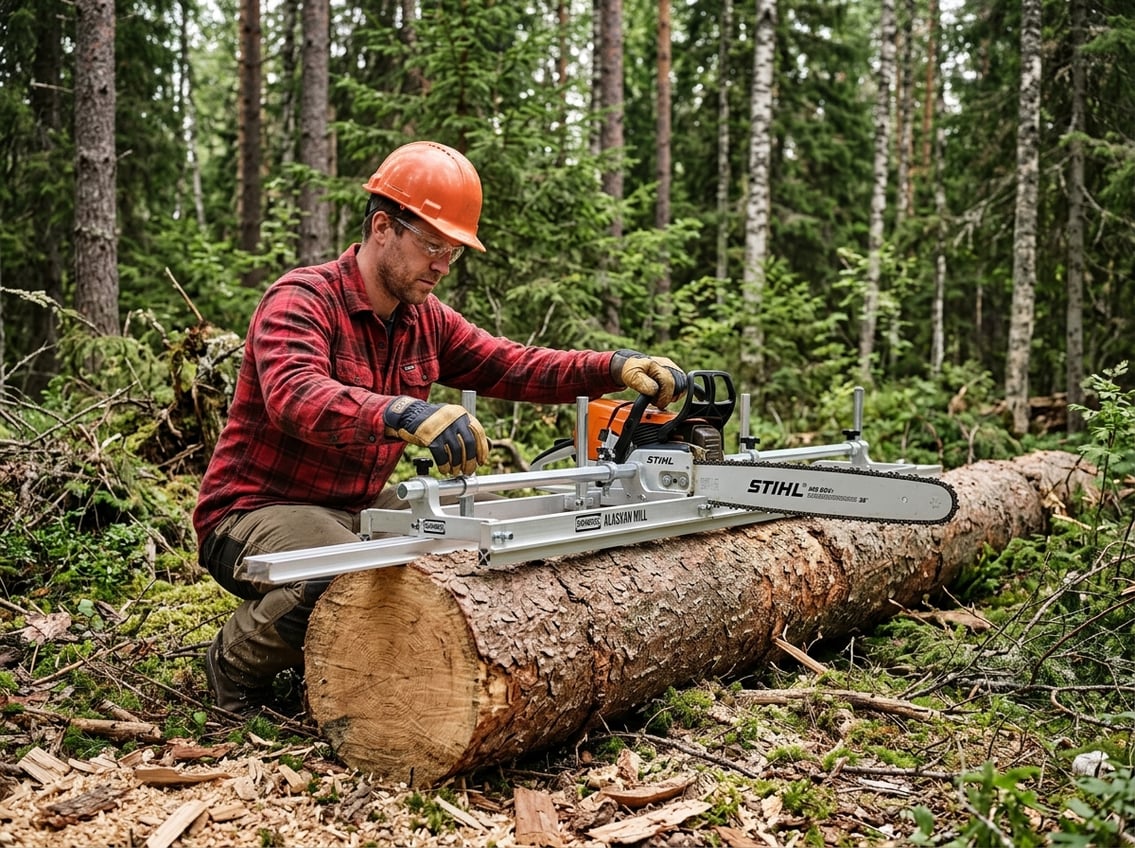
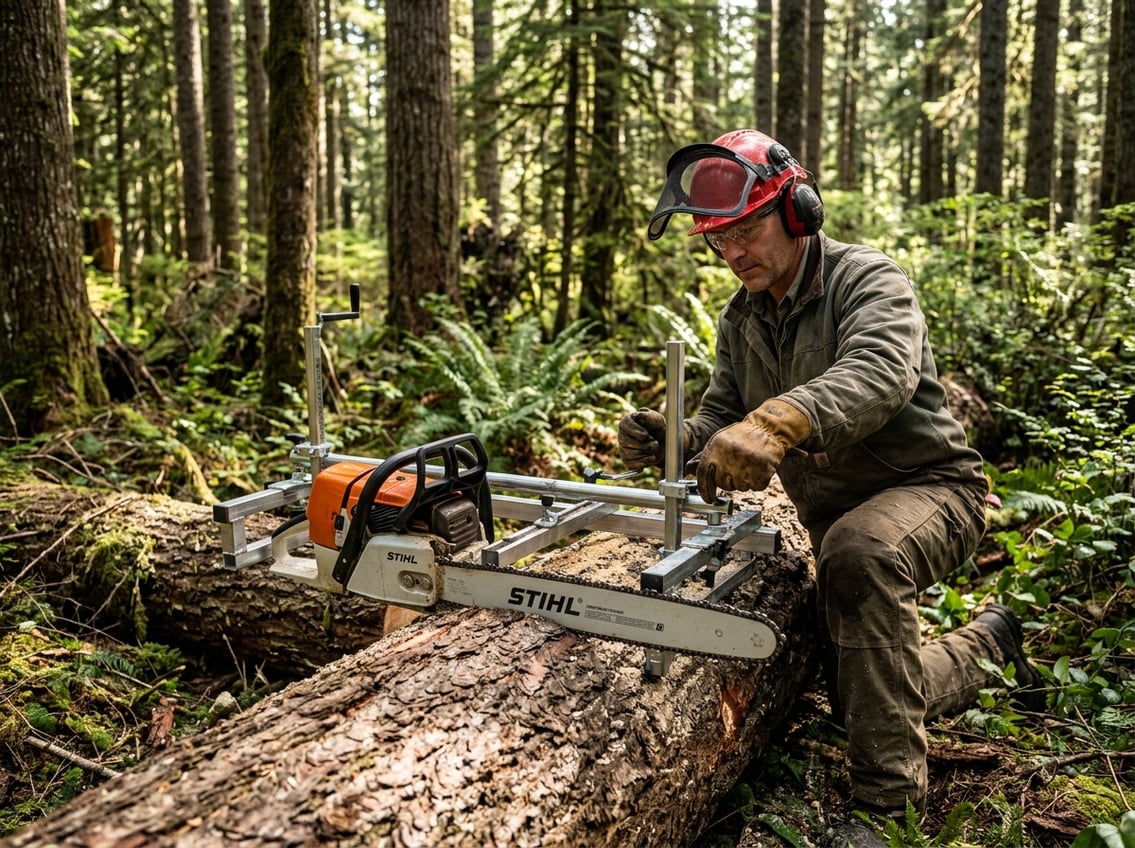
Proper setup requires attaching the mill brackets to the chainsaw bar, aligning the entire assembly with a level guide rail, and setting the depth posts to achieve the desired board thickness.
Attaching and Adjusting the Mill to Your Bar
The mill brackets attach directly to the chainsaw bar using the provided bolts. The user should slide the brackets onto both ends of the bar and tighten them securely. Loose brackets will cause the mill to shift during cutting and produce uneven slabs.
The vertical posts connect to these brackets and hold the horizontal rails. Each post needs to be perpendicular to the bar for accurate cuts. A small square tool helps verify this angle before tightening the adjustment bolts.
Most mills have thumbscrews or wing nuts that allow quick adjustments. The user should check that all fasteners are snug but not overtightened. Metal threads can strip if forced too hard.
The Alaskan MKIV model features enhanced precision adjustments for repeatable accuracy. This professional-grade design makes it easier to maintain consistent settings across multiple cuts.
Aligning the Mill With the Guide Rail
Setting up the first cut requires a straight guide rail attached to the top of the log. Many users attach two square boards to each end of the log and place a ladder or straight board across them as a guide. The mill rides along this guide rail to create a flat reference surface.
The guide rail must be level in all directions. A twist in the rail transfers directly to the cut surface. The user should check levelness with a standard bubble level placed on top of the guide rail in multiple spots.
If the log tends to roll, wedges placed underneath help stabilize it. The guide rail should sit 2-3 inches above the highest point of the log to give the saw enough room to operate. Screws or clamps secure the guide boards firmly to prevent movement during cutting.
Adjusting Depth Posts for Consistent Slab Thickness
The depth posts determine how thick each slab will be. These vertical posts have measurement markings in inches or millimeters. The user sets both posts to the same height by adjusting the mounting brackets up or down.
After the first cut creates a flat surface, that surface becomes the new guide for subsequent cuts. The mill rides directly on the previously cut face instead of the guide rail. Each depth adjustment removes another slab of the specified thickness.
Common slab thicknesses range from 1 to 3 inches depending on the project. Thicker slabs require more power and produce more sawdust. The user should measure both ends of the depth posts to confirm they match exactly. A difference of even 1/8 inch creates tapered boards that waste wood during final dimensioning.
Executing the First Cut: Techniques and Best Practices
From experience: Will’s instinct to move fast has caught him more than once on Alaskan mill setups. His advice: slow down, make sure everything is locked and secure before you pull the trigger. And don’t skip eye and ear protection — the saw runs longer on a rip cut than you expect, and on a windy day the dust still finds your eyes no matter which way you’re standing.
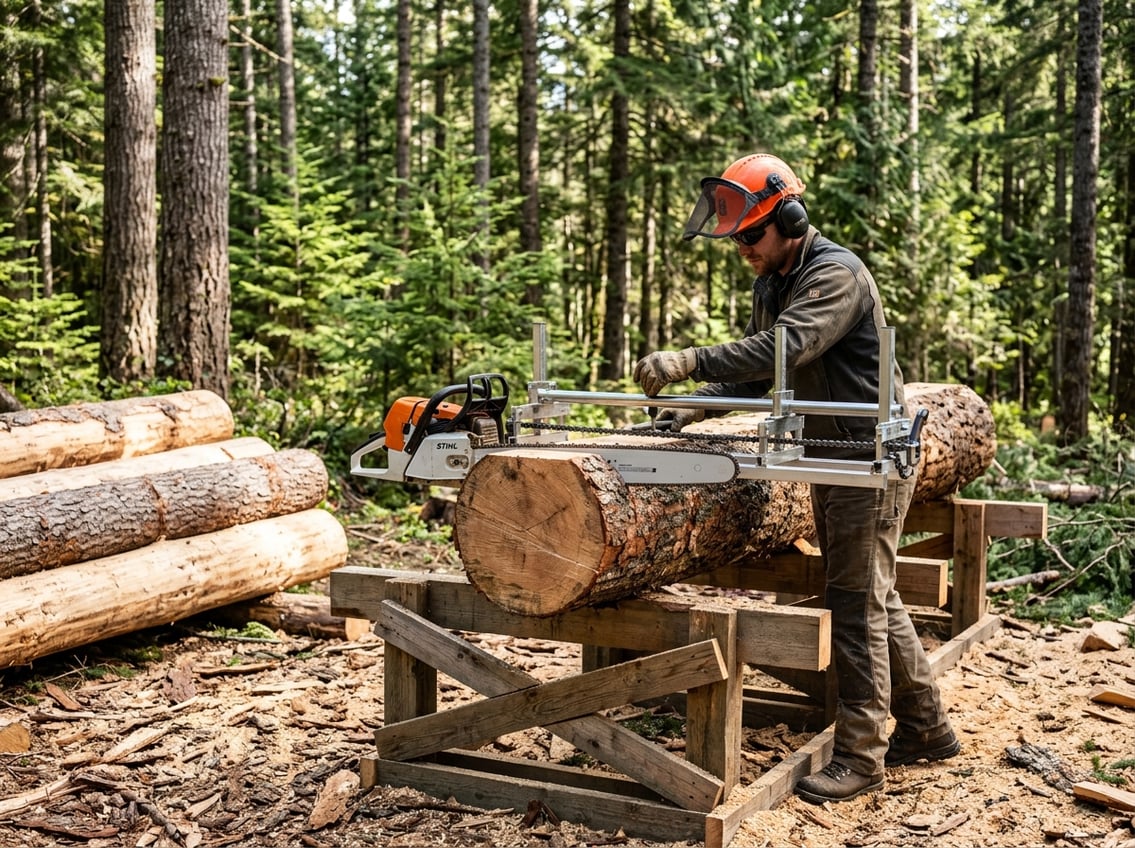
The first cut with an Alaskan mill requires steady control and proper technique to create a flat reference surface for all remaining cuts. Understanding cutting speed, pressure management, and wedge placement prevents binding and ensures safety throughout the milling process.
First Cut Lumber With Chainsaw Mill: What to Expect
The first cut takes longer than subsequent cuts because the chainsaw must work through the entire width of the log. Operators should expect to spend 10 to 20 minutes on a 14-foot log, depending on wood density and bar length. The mill will produce large amounts of sawdust that covers the operator and surrounding area.
The chainsaw may bog down or stall if pushed too hard during the initial pass. This happens most often when the chain dulls or when the operator applies excessive downward pressure. The log may also shift slightly on its supports during cutting, which is normal but requires attention to safety.
Small imperfections in the cut are common on the first pass. These occur when the guide rail shifts or when the log contains hidden defects like knots or embedded debris. A slight wave pattern in the finished slab indicates the operator moved too quickly through harder sections of wood.
Managing Cutting Speed and Pressure
Maintaining consistent speed produces the smoothest cuts and extends chain life. The operator should let the saw’s weight do most of the work rather than pushing down on the mill. Proper alignment and stability during the cutting process ensures clean results.
Key pressure guidelines:
- Apply minimal downward force on the mill frame
- Keep forward movement steady and continuous
- Listen to the engine tone for signs of bogging
- Pause briefly if the chain speed drops noticeably
The chainsaw should maintain near-full RPM throughout the cut. If the engine bogs down, the operator needs to slow their forward movement immediately. Forcing the saw through wood creates excess heat that damages the chain and bar.
Different wood species require different cutting speeds. Hardwoods like oak demand slower passes than softwoods like pine. Green wood cuts faster than dried logs because of higher moisture content.
Chainsaw Mill Wedge Technique for Safe Milling
The chainsaw mill wedge technique prevents the cut from closing on the bar during milling. As the saw progresses through the log, the kerf can pinch the bar if the wood settles or shifts. Plastic or wooden wedges inserted behind the bar keep the cut open.
Operators should insert the first wedge when they’ve cut approximately 12 inches into the log. Additional wedges go in every 2 to 3 feet along the cut. The wedges need only light taps with a hammer to hold position without forcing the kerf wider.
Wedge placement steps:
- Stop the chainsaw when ready to insert a wedge
- Tap the wedge into the kerf behind the bar
- Ensure the wedge sits firmly without wobbling
- Resume cutting and monitor for any binding
The wedges also stabilize logs that tend to roll during cutting. Placing felling wedges at the bottom of unstable logs provides additional support throughout the milling process.
Essential Tips and Troubleshooting for Beginners
New millers often struggle with setup errors and technique issues that lead to uneven cuts and wasted lumber. Understanding common pitfalls, applying proven milling strategies, and following proper safety protocols will help beginners achieve clean, accurate slabs from their first cut.
Common Mistakes and How to Avoid Them
One of the biggest errors beginners make is failing to secure a level guide board for the first cut. Without a straight reference surface, the mill will follow the log’s natural curves and produce wavy slabs. Operators should attach a level guide board to the log using screws or lag bolts at both ends.
Another frequent problem is letting the mill dip when exiting the cut. This creates an uneven surface at the end of each slab. To prevent this, millers should apply light back pressure on the upright handle while supporting the powerhead during exit.
Many beginners also rush through cuts, which burns out chains and produces rough surfaces. The chainsaw should move through the log at a steady, slow pace. Forcing the mill forward creates excessive heat and dulls the chain quickly.
Inadequate depth adjustment causes inconsistent slab thickness. Before each cut, operators must verify the depth posts are set correctly and locked in place.
Chainsaw Milling Tips for Beginners
Starting with smaller logs helps new millers develop proper technique without overwhelming their equipment. Logs under 24 inches in diameter are easier to manage and require less physical effort.
Chain sharpness directly affects cut quality and safety. Dull chains force operators to push harder, increasing fatigue and accident risk. Beginners should sharpen chains every 30 minutes of cutting time or whenever they notice the chainsaw producing dust instead of chips.
Bar length matters for first-time setups. The bar should extend at least 6 inches beyond the widest part of the log. Using too short a bar makes cutting impossible, while an excessively long bar adds unnecessary weight.
Proper chain tension prevents derailment during cuts. The chain should fit snugly against the bar but still pull freely by hand. Checking tension before each cut takes only seconds but prevents dangerous kickback situations.
Operators should also mark their desired board thickness on the depth posts with tape or marker. This visual reference speeds up adjustments between cuts and reduces measurement errors.
Safety Gear and Operation Protocols
Required protective equipment includes:
- Chainsaw chaps or protective pants
- Steel-toed boots
- Safety glasses or face shield
- Hearing protection (earplugs or earmuffs)
- Work gloves with good grip
- Hard hat for overhead hazards
The milling area must be clear of obstacles and bystanders before starting any cut. Operators need stable footing and enough space to move around the entire log without tripping hazards.
Beginners should never mill alone. Having a second person nearby provides help in emergencies and assists with positioning heavy logs. This person should stay at least 10 feet away during active cutting.
Refueling requires turning off the chainsaw completely and allowing it to cool for several minutes. Gasoline vapors can ignite on hot engine surfaces. Operators should also check bar oil levels during fuel stops to ensure proper chain lubrication.
Starting cuts requires both hands on the mill handles at all times. One hand controls the throttle while the other guides the mill along the rails. Losing grip during a cut can cause the chainsaw to kick back violently.
Maintaining Equipment and Caring for Your Milled Lumber
Sharp chains and proper drying techniques make the difference between quality lumber and wasted effort. Regular maintenance keeps the mill running smoothly while correct storage prevents warping and cracking in finished slabs.
Chainsaw and Mill Maintenance Basics
The chainsaw chain needs sharpening after every two to three cuts through a log. Dull chains create excess sawdust instead of wood chips and force the operator to push harder. This increases wear on both the saw and the mill.
Operators should check chain tension before each milling session. A properly tensioned chain sits snug against the bar but still pulls freely by hand. The chainsaw mill attachment requires inspection for loose bolts and worn rollers after every use.
Bar oil levels need checking every 20 minutes during operation. The chain and bar generate significant heat during milling cuts. Adequate lubrication prevents premature wear and potential safety hazards.
Clean sawdust from the mill frame and chainsaw cooling fins after each session. Packed sawdust blocks airflow and causes overheating. A stiff brush removes debris quickly without damaging components.
Proper Drying and Storing of Slabs
Fresh-cut lumber contains 40 to 60 percent moisture and must dry slowly to prevent defects. Stack slabs with stickers (thin strips of wood) placed every 16 to 24 inches between each board. This spacing allows air circulation on all surfaces.
The drying location needs protection from direct sun and rain. Covered outdoor areas work well for air drying. Direct sunlight causes the wood surface to dry too quickly, creating cracks and splits.
Plan for one year of drying time per inch of thickness. A two-inch thick slab requires approximately two years to reach equilibrium moisture content. Weight the top of the stack with concrete blocks or heavy timbers to prevent warping.
Check the ends of boards regularly for splitting. Paint or wax the end grain within 24 hours of cutting to slow moisture loss from these vulnerable areas.
Extending the Life of Your Milling Tools
Ripping chains designed specifically for milling last longer than standard crosscut chains. These chains have modified tooth angles that cut more efficiently along the grain. Replace chains when sharpening reduces the tooth height by half.
Store the mill in a dry location when not in use. Moisture causes rust on metal rails and components. A light coat of oil on bare metal surfaces provides additional protection.
Guide rail systems need cleaning and inspection after each project. Remove pitch buildup with mineral spirits and check for straightness. Even small bends in the guide affect cut quality.
Keep spare chains sharpened and ready before starting a milling project. Having backups prevents delays when a chain becomes damaged mid-cut. Most experienced millers maintain at least three chains in rotation.