
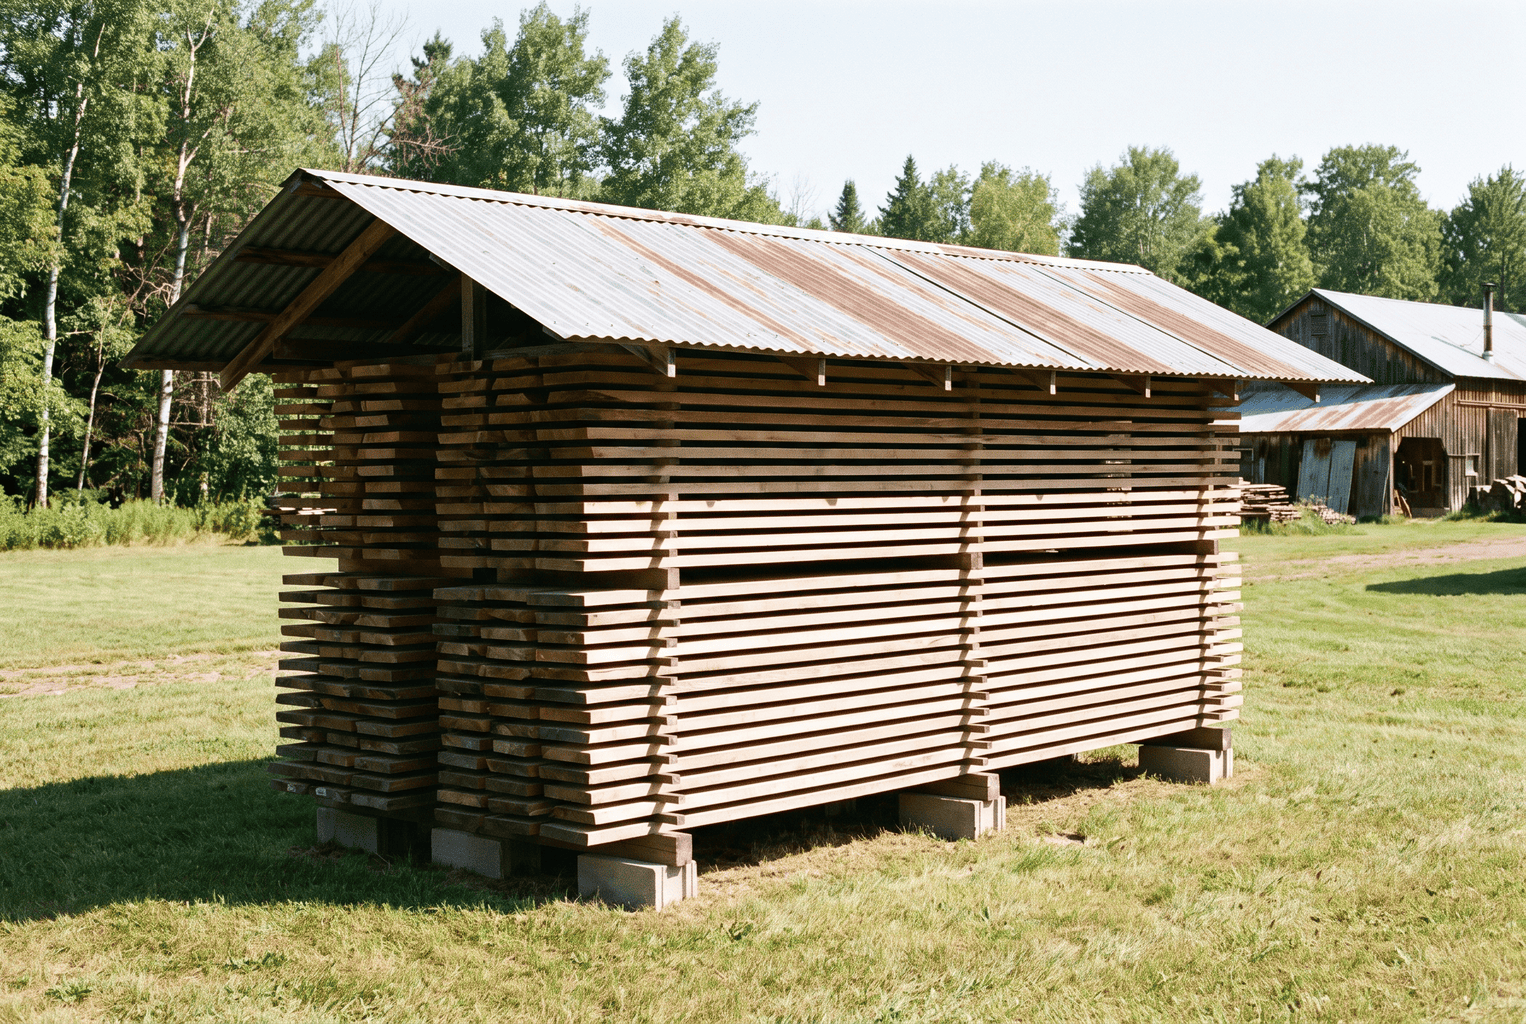
Every spring somebody emails us a photo of a stack of beautiful boards that has turned gray, cupped, and split from the ends. The sawing was perfect. The drying was an afterthought. Air drying is the cheapest part of the whole lumber business, and it is also where the most money gets lost.
Quick Answer: To air dry lumber, stack boards the day they are sawn on a level foundation at least 12 inches off the ground, separate every course with dry 3/4-inch stickers on 16-inch centers lined up directly over each other, seal the end grain, and cover the stack with a roof (not a tarp) and some weight. Plan on roughly 3 to 12 months for 1-inch hardwood to reach 15 to 20% moisture content, and about a year per inch of thickness as the rough rule for thicker stock.
Last Updated: October 2026 | Jason Lewis has run a Wood-Mizer LT15 on upper-Midwest hardwoods for more than ten years and air dries every board he sells.
I’m Jason Lewis, and I’ve run a Wood-Mizer LT15 on upper-Midwest hardwoods for more than ten years. The big-picture version of drying (air versus kiln, equilibrium moisture, shrinkage) lives in our complete guide to drying lumber from a portable sawmill. This article is the narrower job: the exact stack, the exact timeline, and how to know when it is done.
Air drying lumber is the slow removal of water from freshly sawn boards by letting moving outdoor air pass across both faces of every board, with the stack protected from rain and sun, until the wood reaches roughly the moisture content of the surrounding air (about 12 to 16% in most of the northern U.S.).
How Long Does It Take to Air Dry Lumber?
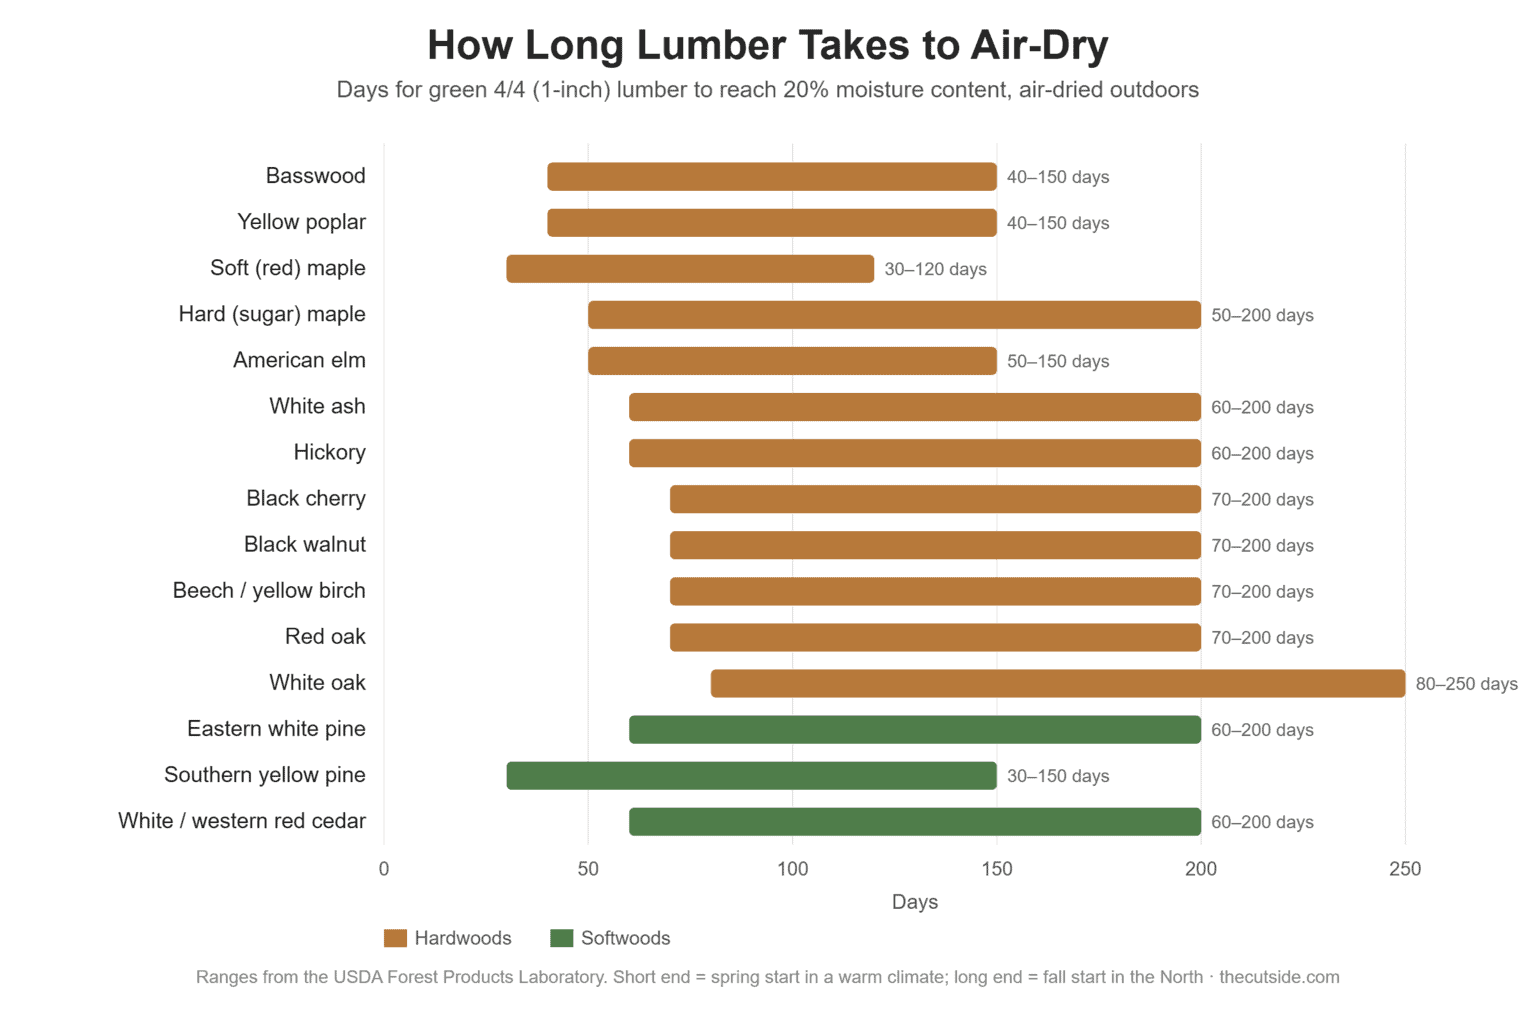
The old rule of thumb is one year per inch of thickness. It is a safe upper bound, not a schedule. Thin hardwood in a warm, breezy summer beats it easily, and thick or dense stock in a damp climate can miss it. Oklahoma State Extension lists 1-inch red oak at 70 to 200 days to reach about 20%, white oak at 80 to 250 days, and sugar maple at 50 to 200 days. Missouri Extension notes that 2-inch lumber can take two to four times longer than 1-inch lumber.
| Species (1-inch / 4/4) | Days to about 20% MC | What affects it most |
|---|---|---|
| Red oak | 70–200 | Check-prone; dry it gently, not fast |
| White oak | 80–250 | Slowest of the common hardwoods |
| Sugar (hard) maple | 50–200 | Stains fast in warm, humid weather |
| White pine | 60–200 | Fast in summer, blue stain in humid heat |
| Loblolly pine | 30–150 | Sapwood stains if it sits unstickered |
Source: Oklahoma State University Extension, Practicalities in Air-Drying Lumber. These are days to roughly 20% moisture content. Getting from 20% down to 12 to 15% takes noticeably longer, and an outdoor stack will not go lower than the outdoor equilibrium moisture content in your area.
When Should You Start a Stack?
Season matters as much as species. Lumber stacked in warm months dries faster than lumber stacked in fall or winter, which is exactly why timing is a trade-off.
| Start date | What happens | Best for |
|---|---|---|
| Late fall to winter | Slow, cold, almost no stain or mold. Drying really starts in spring. | Maple, ash, birch, poplar and other whitewoods |
| Early spring (March–May) | Gets the full warm season; 1-inch stock is often near 20% by fall | Oak, walnut, cherry |
| Midsummer | Fast, but stain, mold and surface checks are the risk | Pine and other softwoods; careful with anything pale |
That is the same pattern I laid out in the pillar guide: saw whitewoods in the cold months, and give oak a full warm season to coast down to dry.
Step-by-Step: How to Stack Lumber for Air Drying
1. Pick the site and build a dead-level foundation
Choose open, well-drained ground with a breeze, away from trees and out of low spots where fog settles. Orient the stack so the prevailing wind blows across the boards (across the stickers), not into the ends. Missouri Extension calls for a foundation at least 12 inches above the ground with supports no more than 24 inches apart; we run pressure-treated 4×4 bunks on concrete blocks on 16-inch centers, about 18 inches up. Run a string line and a level across every bunk. A quarter-inch sag in one bunk becomes a bow in every board above it.
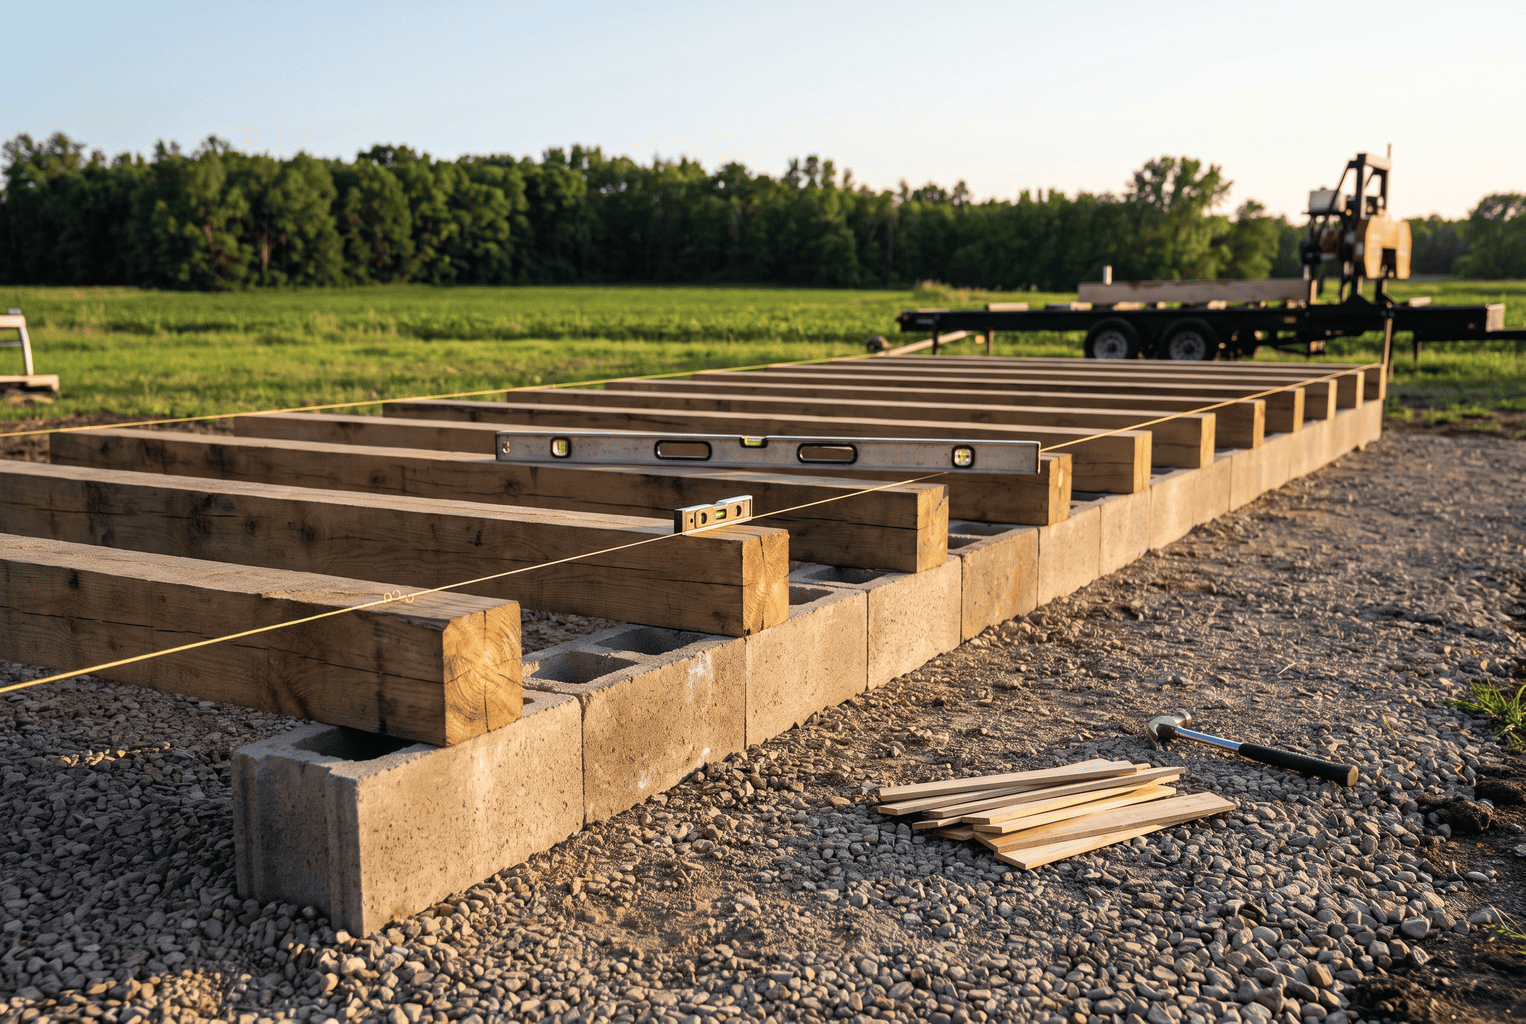
From experience: Mine sits on leveled concrete blocks with runners under the stack. Nothing fancy, just dead level.
2. Sort before you stack
One species, one thickness, and as close to the same length as you can get per stack. If lengths have to be mixed, put the longest boards at the bottom and keep every board end sitting over a sticker. Unsupported ends droop and split.
3. Sticker every course
Stickers are the thin strips between courses that let air pass over both faces. Our standard is 3/4-inch thick by 1 to 1-1/4 inches wide, same thickness on every one, bone dry, on 16-inch centers (never more than 24), flush with the board ends and stacked in a perfectly vertical line over the bunks. Use the same species or dry poplar or pine so tannins and pitch don’t stain the boards. Other extension sources run 1-inch by 1-1/2-inch stickers; the rule that matters is uniform thickness and perfect alignment, not the exact dimension.
| Sticker rule | Spec | If you get it wrong |
|---|---|---|
| Thickness | 3/4 inch (1 inch for slabs), all identical | Boards bend around the thick ones |
| Spacing | 12–16 inches for oak and furniture stock; 24 inches max | Sagging, warp between stickers |
| Ends | Flush or within 2 inches of the board ends | End droop and splits |
| Alignment | Directly above the bunk and the sticker below | Every course picks up a bend |
| Moisture | Dry, under 20% | Green stickers stain and rot |
4. Seal the ends right away
Water leaves through end grain 10 to 12 times faster than through the faces, so the ends dry and shrink first and crack. Brush a wax emulsion end sealer (Anchorseal 2, the 1-gallon jug on Amazon, is the one everybody knows and what we reach for) or two heavy coats of exterior latex paint on the ends within minutes of sawing. Missouri Extension notes sealing slows drying, which is the point: it keeps the ends from outrunning the middle. It is worth the money on walnut, cherry, quartersawn oak and slabs. It is optional on framing and fence boards.
5. Roof it and weight it
Put a sloped roof of metal panels or plywood over the stack with an air gap between the roof and the top course. Missouri Extension recommends a gap of about 6 inches and an overhang as much as 24 inches on every side. We use a minimum of 6 to 12 inches of overhang and add more where driving rain is common. Then weight the top: concrete blocks over every sticker line is plenty. Extension guidance puts the target near 40 pounds per square foot on the top courses, which is what stops the top boards from cupping. A tarp laid directly on the boards traps moisture and grows mold.
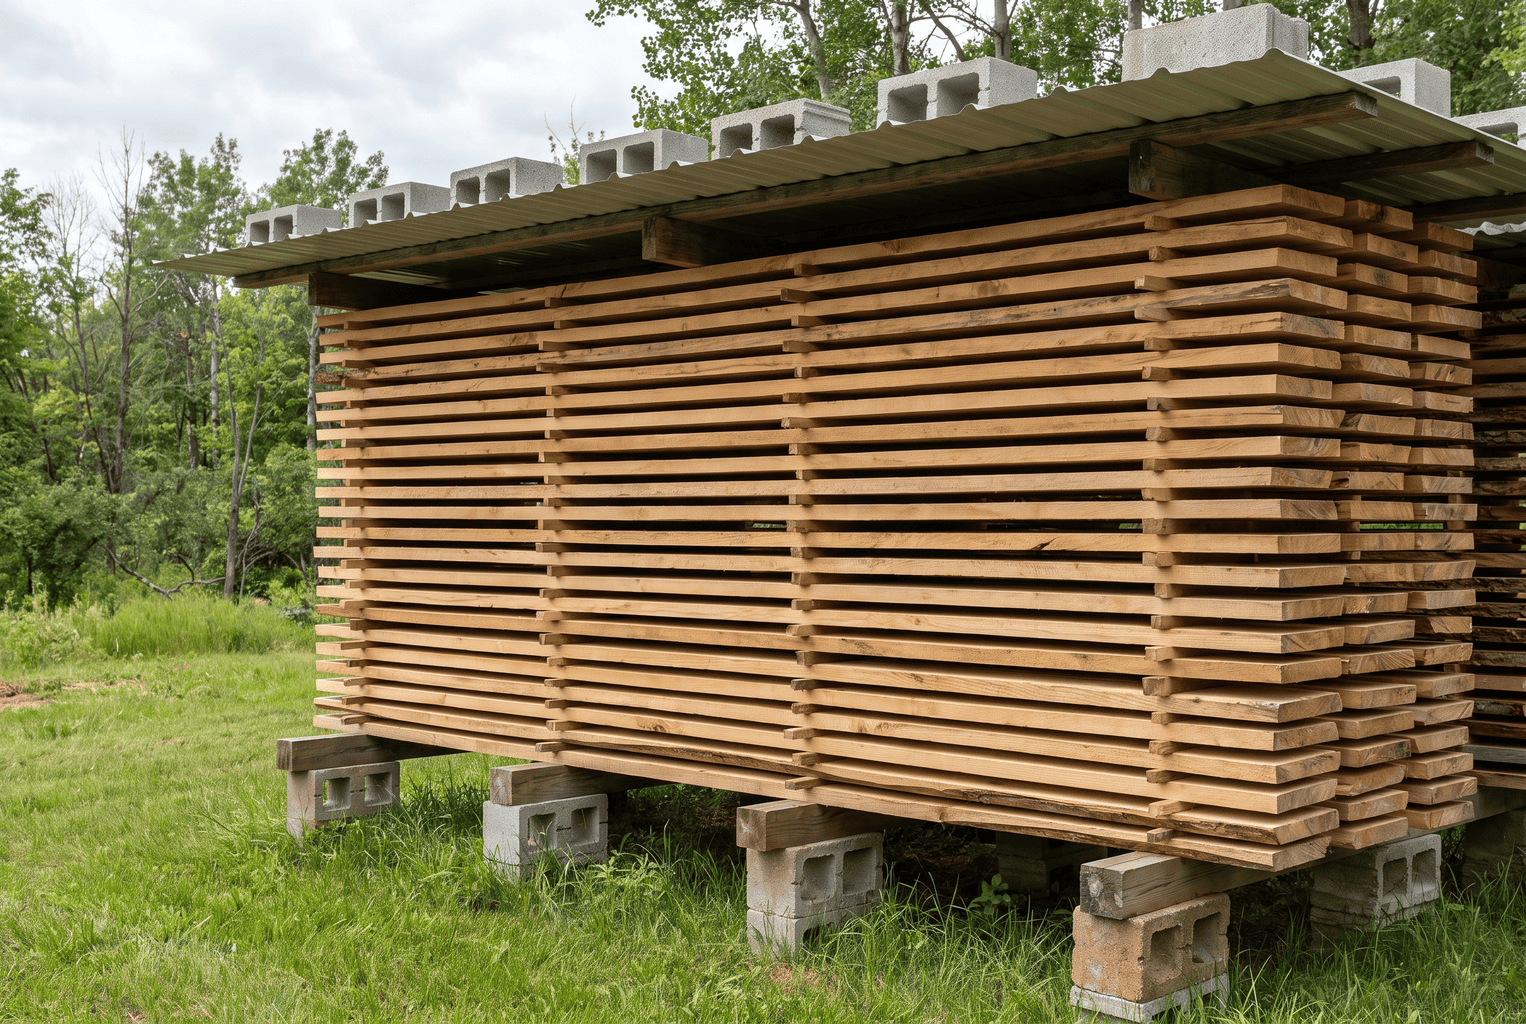
From experience: I use an old sheet of metal roofing pitched over the top and leave the sides open.
6. Leave the sides open and walk the stack
Once a month, walk the stack. Look for mold on the stickers, boards that have crept out of line, and a roof that has shifted. Tighten any straps; they go slack as the stack shrinks.
How Do You Know When Lumber Is Air Dry?
Lumber is air dry when its moisture content stops dropping and matches the outdoor equilibrium moisture content, typically 12 to 16% in the northern U.S. and about 14 to 19% by Missouri Extension’s range for air-dried hardwood. Three ways to check:
- Pin meter. A pin meter like the Lignomat Mini-Ligno MD (a pin-type meter in the roughly $100 range) is plenty for a sawyer. Push the pins in at the middle of the board, not the ends, and read 3 or 4 boards from the center of the stack. Pins that read at the surface only will fool you on thick lumber.
- Weigh a sample board. Pull a few labeled sample boards, weigh each one every two weeks, and call them done when the weight stops falling for two or three weighings. No meter needed.
- Cut and test. Crosscut a short piece from the middle of a board, slice a thin section, and test it; this catches the wet core under a dry shell.
If the lumber is going into a heated house, air drying is only the first half. Furniture-grade wood needs 6 to 8%, which means a kiln or a long stay in a heated space. See the pillar guide for kiln options.
Common Air-Drying Problems and Fixes
From experience: My worst mistake was waiting to sticker a stack. I got mold and warp from boards drying unevenly, and I learned real quick to seal the ends before they start checking.
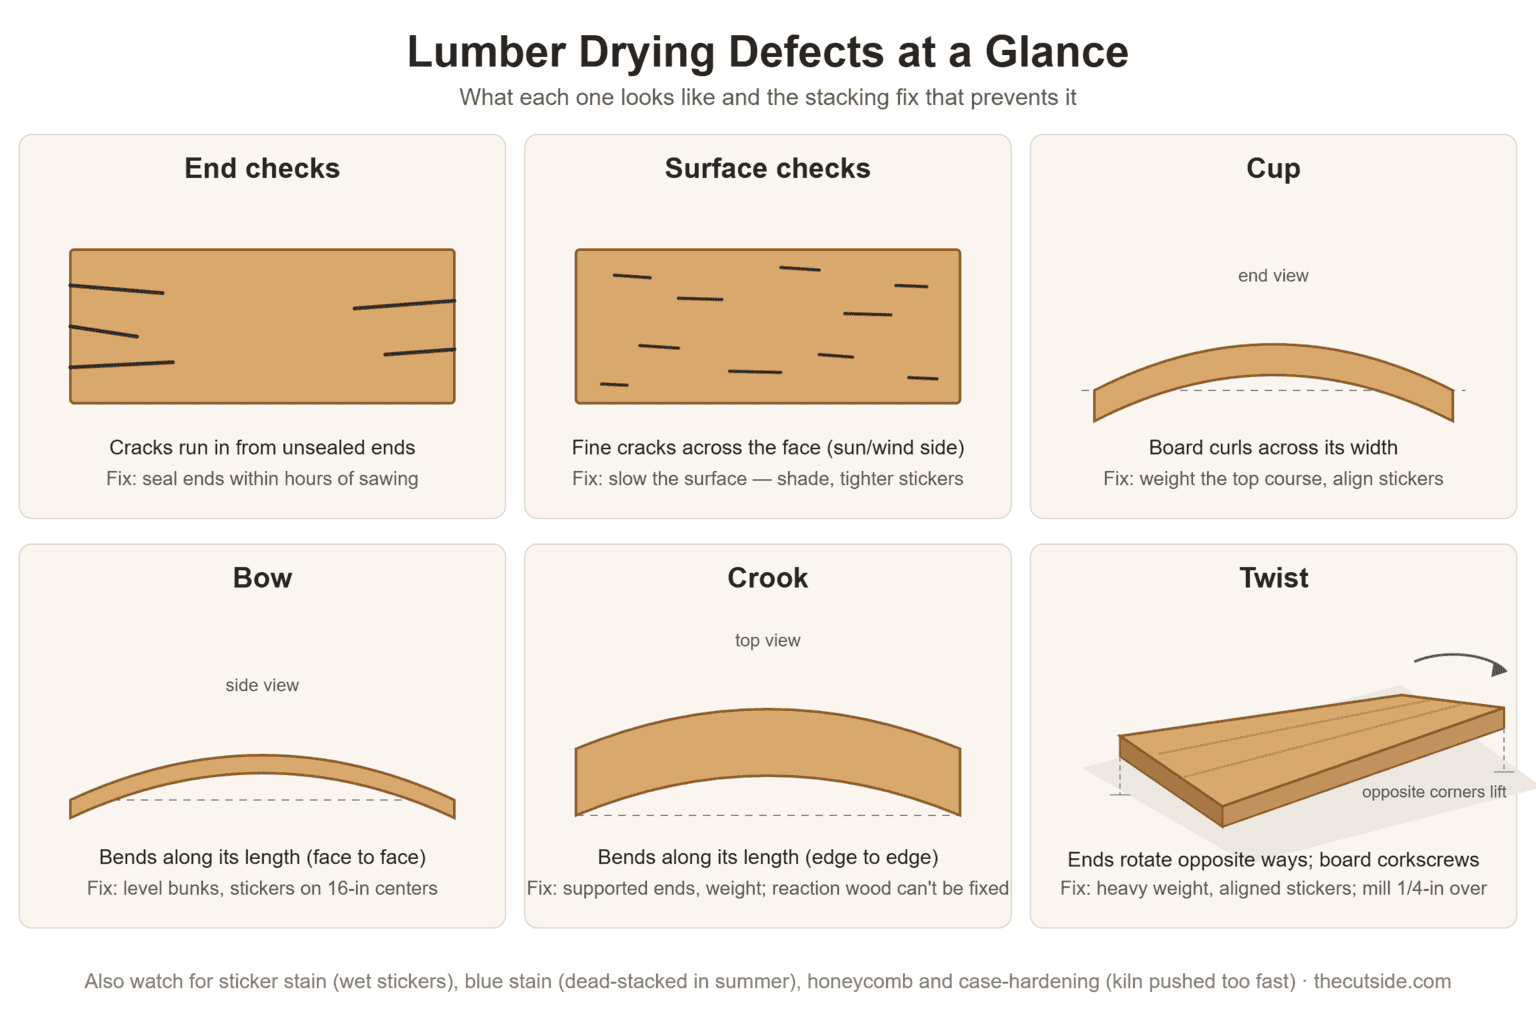
| Problem | Usual cause | Fix |
|---|---|---|
| End checks | Unsealed ends, hot sun on the ends | Seal ends at the saw; shade the ends |
| Surface checks | Drying too fast in hot sun | Shade the sun side; slow the airflow |
| Cup, bow, twist | Uneven bunks, mismatched stickers, no weight | Re-level foundation; align stickers; add weight |
| Gray or blue stain | Dead-stacking, slow start, damp stickers | Sticker within hours; saw whitewoods in cold weather |
| Mold on stickers | Poor airflow, ground moisture, tarp on the stack | Raise the stack; open the sides; swap the tarp for a roof |
| Boards dry on one side | West-facing sun, uneven wind | Plywood shade or move the stack |
Most of these also show up in our bandsaw mill troubleshooting guide, because a board that’s cut wavy is much harder to dry flat.
What About Slabs and Thick Stock?
Slabs and 8/4 or thicker lumber follow the same rules and a much longer clock. A 2-inch plank can take two to four times as long as 1-inch stock, and wide slabs crack from the ends and faces, so seal the ends and 6 inches or so of each face. Our live edge slab guide covers slab sealing and flattening in detail.
Is Air Drying Worth It If You Sell Lumber?
Yes, because it turns green boards into inventory. Air-dried lumber sells for more than green and it cuts the kiln time on anything you finish. Use our board foot calculator to work out how many board feet you are carrying through the stack, and read how much you can make with a portable sawmill for what dried stock does for margin. If you are building a business on it, our guide to starting a mobile sawmill business covers stock planning.
If you’re still choosing a mill, our complete guide to portable sawmills is the place to start, and the Wood-Mizer LT15 review covers the mill behind these stacks.
Frequently Asked Questions
How long does it take to air dry lumber?
For 1-inch hardwood, about 3 to 12 months to reach around 20% moisture content depending on species, season and climate. The rule of thumb is one year per inch of thickness, and 2-inch stock can take two to four times longer than 1-inch.
How far apart should stickers be?
Every 16 inches is a good default for 1-inch hardwood, 12 to 16 inches for oak and furniture stock, and never more than 24 inches. Stickers should be the same thickness and lined up directly over the foundation supports and over each other.
Should you cover lumber while it air dries?
Yes, with a roof, not a tarp. A sloped sheet of metal or plywood with an air gap and overhang keeps rain and sun off the stack while the sides stay open for airflow. A tarp laid directly on the boards traps moisture and grows mold.
Can you air dry lumber to 8% moisture content?
Not outdoors. Air-dried lumber settles at the outdoor equilibrium, roughly 12 to 16% in most of the northern U.S. For indoor furniture you need a kiln or a heated space to finish to 6 to 8%.
Do you need to seal the ends of lumber?
For valuable species, yes. End grain loses water 10 to 12 times faster than the faces, so unsealed ends crack. Seal with a wax emulsion or two coats of exterior latex paint within minutes of sawing.
The Bottom Line
Air drying is simple but it is unforgiving about the basics: a level foundation, aligned stickers, sealed ends, a real roof, and patience. Do those five things and most of the warp, stain and splitting problems never start. Then test with a meter, not the calendar.
Jason Lewis has run a Wood-Mizer LT15 on upper-Midwest hardwoods for more than ten years and air dries every board he sells.